I have really tried to emphasize, that technique
is everything in Baking bread, it is perhaps the most important
key. I believe that the biggest failures in making bread
are made by trying to follow the recipeToo closely. Bread
does not and never will adhere to an exact recipe. And to
be able to do so, all conditions have to be perfect.A good
baker learns to see those signs.
So learning to bake bread, is learning how to send it thru
all of its stages,while making adjustments for environmental
factors. Some examples are the amount of flour. I do measure,
yeast, sweetener, salt, etc. Sometimes I add a bit more,
but I always measure and know exactly how much extra I have
used. But flour is a different matter. You will notice that
most bread recipes, give you an approximate amount of flour,
with usually about a 1 – 2 cup leeway. There is a
reason for that, things such as temperature, and humidity
can vastly affect the flour to water ratio, so in short,
if you simply measure out the flour and dump it in, you
will find that your success rate will not be very satisfying.
What to do? Learn to be able to look at your dough and know
when there is enough flour. Same goes for kneading and rising,
the recipe says 5minutes, but that might not be enough,
Rising your dough for 30-45 minutes might be enough in the
summer, but in the winter, you will almost certainly have
to go about double that. Learn to know, what is optimum,
and it will allow you to be a baking pro.
Ok lets start from the beginning
.
I have several tips and techniques I want to share with
you, but I will start with one of the most basic and simple,but
very important: Temp your water.
All of your ingredients, except your water, should be at
room temp, I do leave my instant yeast in the fridge, and
it does not affect the quality, however if you are using
active dry, and storing it in the fridge, you would be wise
to dissolve it in warm water first. ? Your water should
read between 100 -120 degrees.
Next is mixing the ingredients, we will do a step by step,
later of a couple different recipes.I had planned on showing
you how this was all done, by both mixer, and by hand,white
and wheat but a flare up of fibro and back problems, nixed
that, so I am going only going to show you the white bread
in the mixer right now. It is easily adaptable to mixing
by hand. I will go into more depth next week about whole
wheat, and whole grain breads.
The most important things for you to know though, is you
want put your dry ingredients in a bowl, ( only 2 cups of
flour at first) and then add all your liquid ingredients.
Stir this all well ( or mix in mixer) till the contents;
that should be quite runny right now, are smooth, and velvety,approximately
2-3 minutes. At this point it will be time to start adding
flour again. A little at a time, allowing the dough to smooth
out, and get the velvety look to it again. Once the dough
begins to form into a solid mass,  and
becomes hard to stir, it is time to turn out the dough onto
a floured surface. If you are using a mixer, you will see
that at least 2/3’s of it now stick to the beater.
If you are using the regular beater, be sure that at this
time, you change to a dough hook.
and
becomes hard to stir, it is time to turn out the dough onto
a floured surface. If you are using a mixer, you will see
that at least 2/3’s of it now stick to the beater.
If you are using the regular beater, be sure that at this
time, you change to a dough hook.
Continue to add flour and working it in, either by hand
or by mixer,a bit at a time, allowing the dough texture
to smooth out in between additions. You will KNOW that you
have enough flour when the dough stops sticking to the sides
and bottom of the mixer,  or
in the case of by hand mixing, your hands and the counter
tops. At this point do not add any more flour. IF it is
the tiniest bit sticky, that is fine, it should be.Some
bread doughs will be stickier than others, but a basic white
bread dough should have a tacky feel to it,but not pull
away onto your hand when you touch it.
or
in the case of by hand mixing, your hands and the counter
tops. At this point do not add any more flour. IF it is
the tiniest bit sticky, that is fine, it should be.Some
bread doughs will be stickier than others, but a basic white
bread dough should have a tacky feel to it,but not pull
away onto your hand when you touch it. I have attatched photo’s on how to knead the bread,
but it is basically a fold over and towards you, push down
and out. Turn the bread a quarter turn, so the longest side
is perpendicular to you. Fold over and towards you again,
and continue till the dough is ready.
I have attatched photo’s on how to knead the bread,
but it is basically a fold over and towards you, push down
and out. Turn the bread a quarter turn, so the longest side
is perpendicular to you. Fold over and towards you again,
and continue till the dough is ready. 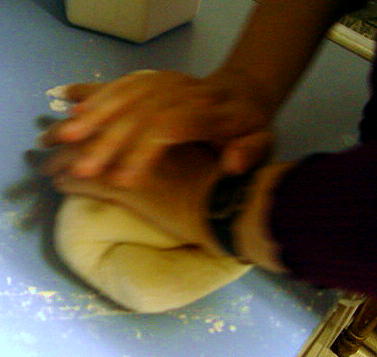
Next Page
